
|
|
The Archive option on the Manager menu provides an easy way to copy files to and from backup media such as disks and tape. These media are removable so that you can retain a personal archive copy of your work to transfer to another machine or to keep in a secure place.
Archive allows you to:
Here are brief descriptions of the Archive menu options:
| Option | Description |
|---|---|
| Extract | copies files from disk or tape into your current directory |
| List | lists all files on a disk or tape |
| Format | formats a disk or tape to prepare it for copying files |
| Create | copies files from your current directory to a disk or tape |
| Type | selects the archive file format: tar, cpio, or DOS |
| Device | specifies the address of the disk or tape drive for archiving |
Before you use the options in the Archive menu, make sure that the disk or tape that you intend to use is properly inserted. If you wish to write to a disk or tape, check that the physical mechanism used to enable writing is set on the disk or tape. For 5¼ inch disks, you must remove the write protect tab; for 3½ inch disks and quarter-inch cartridge tapes, move the slider or turn the wheel to the position that allows writing. If you need more information about using disks or tapes, ask your system administrator.
You must also make sure you know the device address for the tape or disk drive you intend to use. (The device address is the name that the system knows the disk or tape drive by.) For information on device addresses and how to set yours, see ``Specifying the archive device address''.
After inserting your disk or tape and specifying the device address, you need to choose a type of format for archiving. The three available types of format are tar, cpio, and DOS. Generally, tar is the most useful format. If your system does not support the use of tar, use cpio. You can use the DOS format to copy files to a single disk, but it does not support archiving of whole directories, nor does it support tape formatting. To carry out your choice of archive format, see ``Specifying the type of format for archiving''. Once you have chosen an archive format, use that format for all future archiving so that your disks or tapes are interchangeable.
The operations that you can perform with the Archive options are discussed in the following sections.
Before archiving files, you might have to format the disk or tape that you want to archive them on. First make sure you have set your format type, as described in ``Specifying the type of format for archiving''. If you are not sure what format type is used on your system, or if you are not sure whether you need to format your disk or tape, check with your system administrator. If you do need to format the disk or tape and the type is set correctly, choose the Format option on the Archive menu. The Media Formatting form appears.
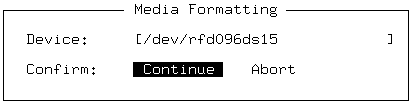
To format a disk or tape on an archiving device other than the default one, change the entry in the ``Device'' field; press <F3> for a list of available devices. Otherwise, press <Enter> to accept the default device. For more information on this choice, see ``Specifying the archive device address''.
To confirm your decision to begin formatting, press <Enter> again. Formatting takes a few minutes. You are then returned to the Manager menu.
If you decide not format the media, select the Abort option in the ``Confirm'' field.
It is important that you make sure that you format enough media to
archive your data. If you are unsure of how much media is required,
ask your system administrator.
The Create option copies files from your current directory to disk or tape. When you select the Create option, the screen displays a list of the files in your current directory. Select the file(s) that you want to copy. (If you are making a DOS archive, each file must be individually selected.) If you are using tar or cpio and you select a directory, all of its contents, including any subdirectories and their contents, are transferred onto the disk or tape.
Press <Enter> to begin the copying process. If the archive fills more than one volume (disk or tape), a prompt to insert a second volume is displayed. After the files that you selected have been copied to the archive, you automatically return to the Manager menu. (DOS archive does not create multivolume archives.)
When you make a tar or cpio archive, all existing files on the archive media are overwritten. When you make a DOS archive, only those files on the archive that have the same name as the files you are copying are overwritten; all others remain intact. Remember that you can archive files but not directories in the DOS format.
Before copying files from a disk or tape to your current directory, you might want to see what files it holds. Select the Archive menu's List option to display a list of the files on the tape or disk. If the list fills more than one screen, use the movement keys to scroll through it. If you see a prompt for a second or subsequent volume, insert the next disk or tape of the archive you are listing. Make a note of the files that you want to retrieve. When you finish looking at the list, press <Esc> to clear the screen and return to the Manager menu.
The Extract option in the Archive menu copies files from disk or tape into your current directory.
When you choose the Extract option the Media Extraction form appears.
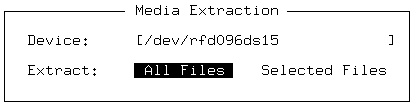
To extract files from a disk or tape drive other
than the default one, change the entry in the ``Device'' field.
Otherwise, press <Enter> to accept the default device.
For more information on this choice, see
``Specifying the archive device address''.
To copy all files in the archive to the current directory, leave the All Files option selected for the ``Extract'' field and press <Enter>. Copying begins immediately. If more than one volume (one tape or disk) is required for the archive, a prompt to insert a second volume is displayed. When archiving is finished, you automatically return to the Manager menu.
If you want to copy only certain files, select the Selected Files option of the ``Extract'' field. In response, a list of all files on the disk or tape appears on the screen. The list looks similar to the following example. If you are listing DOS files, the filenames appear in all uppercase characters.
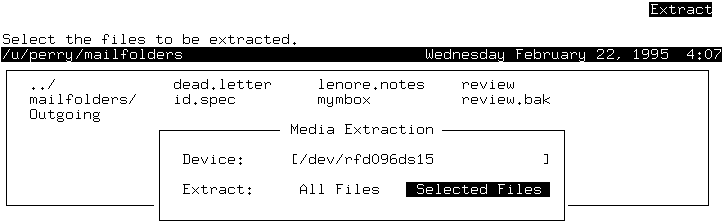
Use the movement keys to scroll through the list. Select the files you want to extract with the <Space> bar, and press <Enter> to copy the files into your current directory.
The Type option in the Archive menu specifies the format you intend to use for archiving. When you select the Type option, the following form appears:
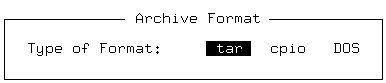
Select the archive file format that is best suited to the
archiving you intend to do.
In most cases, tar format is the best choice.
See your system administrator if you are not sure which format to select.
The Device option in the Archive menu specifies the address of the device driver for the device you intend to use for archiving. When you select the Device option, the following form appears:

The ``Device'' field automatically displays the address of the drive that is normally used for archiving. If you intend to use that drive, just press <Enter> to accept this entry.
To see a list of all possible drives on your computer system, press <F3>. A box appears on the screen with a list of the devices in the /dev directory on a typical system; your list might have additional or different entries.
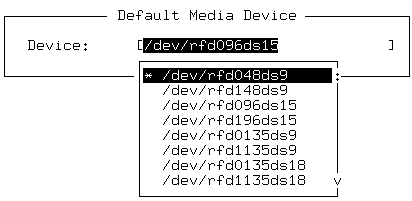
The names of the devices appear in coded form. According to the conventions of the code, the first letter of the filename (r in the sample list) stands for the access method; you can usually ignore this letter, as it is the same for most devices.
The next two letters specify the type of media; fd stands for floppy disk and ct for cartridge tape. The next number (0 for most devices in the sample list) is the number of the disk or tape drive. The final characters of the code (for example, 48ds9) are size parameters for floppy disks. They indicate the number of tracks per inch, the number of sides used (ss=single-sided, ds=double-sided), and the number of sectors per track.
The following table indicates the size and type of media associated with each drive in the sample list.
| Device code | Size and type of disk or tape |
|---|---|
| rfd048ds9 | 5¼ inch 360KB floppy disk |
| rfd096ds15 | 5½ inch 1.2MB floppy disk |
| rfd0135ds9 | 3¼ inch 720KB micro-floppy disk |
| rfd0135ds18 | 3½ inch 1.44MB micro-floppy disk |
| rct0 | standard tape drive |
| rctmini | mini-cartridge tape drive |
The /etc/default/tar file on your system must contain
valid archive devices for your choice to take effect.
If you do not know what devices your system supports,
or if you do not know which device to choose, see
your system administrator.