
|
|
Use the File option in the Manager menu to organize and manipulate files. When you select the File option, the following menu appears:
Here are brief descriptions of the options in the File menu:
Use the Copy option to make a copy of one or several files at a time. You can place the copy in any directory for which you have the correct permissions. For more information on file permissions, see ``Changing permissions''.
After you select the Copy option from the File menu, a list of the files in your current directory appears, along with a message asking you to select the file that you want to copy.
Choose the appropriate file. When you make a selection, another message appears. This one asks you to select the file to copy to. Now you must select a destination for your file(s).
If you are copying a single file, you can enter any destination filename that does not already exist. Do not enter the name of a file that already exists; doing this overwrites the contents of the file, replacing them with the new data. If you specify a directory only, a copy of your file with its original name is put in that directory. If you are copying a group of files, you must specify a directory as a destination.
This first example creates a backup copy of the file review called review.bak. First, select the Copy option. The File menu disappears, and you are asked to enter the name of the file from which you wish to copy. In this case, type review. The word appears after the pathname /u/perry.
Now press <Enter> to execute the selection. At this time, you are asked to enter the name of the file to which you want to copy. In this case, type review.bak and press <Enter>. The File menu appears. There is now a file called review.bak in the directory /u/perry, containing an exact copy of the file review.
Here is another example. This time, copy the files dead.letter and mymbox into the directory mailfolders. Again, you must select the Copy option. Now mark the files to be copied by moving the highlight to each file and pressing <Space>. See ``Selecting files'' if you are not sure how to do this. This is what the screen looks like after you mark one of the two files:
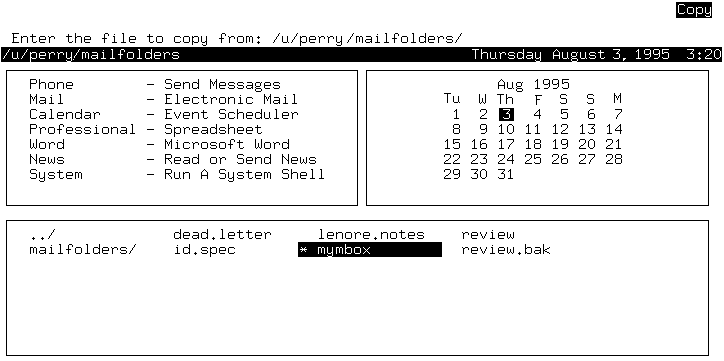
Now, press <Enter> to execute the selection. The ``copy to'' line appears, just as in the previous example. Type mailfolders or select mailfolders on the screen to select the mailfolders directory. When you press <Enter> copies of the two files are placed in the mailfolders directory, and you return to the File menu. SCO Shell gives the copies the same names and permissions as the original files.
The Rename option is used both for changing the name of a file and for moving files from one directory to another. It can also be used to rename directories. Using the Rename option is similar to using the Copy option, but you do not leave a copy of the file in the original location. After selecting the Rename option you perform the same steps to rename a file as to copy a file, and the procedures involved in moving files to a different directory are just like those used to copy files to a different directory.
When you select the Rename option from the File menu, a message appears, prompting you to select the file that you want to rename.
When you have made your selection, a new message appears, prompting you to enter the new filename. At this point, you select a destination for your file(s).
To remove files, use the Erase option; this option does not remove directories. (See ``Managing directories'' for information on removing a directory.) When you select the Erase option, you are prompted to select the file that you want to erase. Once you select the files and press <Enter>, you return to the File menu. The directory listing is updated to show that the files have been erased.
When you erase a file, SCO Shell places it in your wastebasket directory. The file remains there until you exit SCO Shell. You can recover files from the wastebasket with the Wastebasket option, see ``Recovering erased files''. When you exit SCO Shell, all the files in the wastebasket directory are permanently deleted, and there is no way to recover them.
The Find option lets you search for and list files with specified names. Find looks for a named file starting in the current directory, then in all subdirectories. When you select the Find option, a form appears, with a field for specifying the full or partial filename that you want to search for. The form looks like this:

Use the full filename if you want to find just one file.
If you want to find a number of files with similar names,
specify the part of each filename that is the same, and use
wildcard characters for the rest of the filename.
For example, to list all files with the .dcx
extension, enter  .dcx in the ``Filename'' field.
For more information about using wildcard characters, see
``Using wildcard characters''.
.dcx in the ``Filename'' field.
For more information about using wildcard characters, see
``Using wildcard characters''.
Note that the listing produced might contain files from numerous different directories at different levels of your directory tree. If you no longer want to see the listing of files from different directories, and instead you want to display only the files in your current directory, choose the Unfind option in the File menu. After choosing Unfind, you can no longer see files in numerous different directories in your directory tree.
You can use the Find option to carry out a task on several different files in a list. First use the Find option to display the list of files. Choose a task option from the File menu. Finally, choose the files to be acted upon.
Every file or directory has a set of permissions that control who can read them, change them, and execute them. With the Permissions option, you can change permissions on files and directories you own to make them more or less accessible to other users on your system.
Each file has three different sets of permissions: one for the user, the owner of the file; one for the group, the other users in your work group; and one for all, meaning everyone on your system. Each set of permissions can include none, one, or more than one of the following privileges:
The Permissions option lets you change the permissions on one
file at a time. (To change permissions on a directory use the
Manager  Directory Permissions
menu.) The Permissions option also shows you the current permissions.
To change permissions on a file, proceed as follows:


The form displays the current permissions for the file you selected, and the owner and owner's group. The asterisks between the brackets show who has what permissions. In this example, the User (owner) has Read and Write permissions, while Group and All have only Read permissions. This means that anyone can read the file, but only the owner can change it. No one can execute it.
To remove permissions press the <Space> bar in a field that already has an asterisk: the asterisk disappears.
If you just want to see what a file's permissions are, select it through the Permissions option but make no changes. Simply press <Esc> when you have finished looking at the File Permissions form.
Your File window can also show you a file's permissions if the window is configured to show system file listings; that is, listings that show detailed technical information about each file. See ``Changing the content of the File window'' for details.
The wastebasket option lets you manipulate the files in your wastebasket directory. When you select the Wastebasket option, this menu appears:

Here are brief descriptions of the Wastebasket menu options:
| Option | Description |
|---|---|
| Select | recovers file(s) from the wastebasket |
| Delete | permanently erases file(s) from the wastebasket |
| Clear | permanently erases all of the files in the wastebasket |
If you choose the Clear option, all the files in the wastebasket are permanently removed. The wastebasket is cleared automatically each time you exit SCO Shell.